Showing posts with label 3D. Show all posts
Showing posts with label 3D. Show all posts
Wednesday, June 17, 2009
Wednesday, April 15, 2009
Citizen Kane 3D
Awesome. Not sure if he used successive frames from a dolly shot or cut out different elements and did it "by hand," but the results look really good.
Friday, November 21, 2008
Anaglyph Games
The entries from Gamma 3D have been posted. I had only really read anything about a couple of them but I look forward to giving myself a headache playing them all.
Monday, November 10, 2008
Anaglyph Game
I had been playing around with making a little video game that makes use of 3D glasses, and I sort of ran out of steam on it so I thought I'd post up what I had. It's more of a proof of concept than a full game.

It's just a regular side-scrolling platformer, but in addition you can use the up and down keys to move back and forth along the z-axis. With red/cyan anaglyph glasses on, you should be able to distinguish between solid blocks, spikes, and enemies that are at different depths, and plot your course appropriately.
I made it in the free version of Game Maker, which was super easy and fun. The full version might allow you to alter the low-level rendering routines to do the anaglyph offset at runtime, but I just made different versions of each sprite for the different depth levels and switched between them.
I was already playing with this stuff when I read about Kokoromi's Gamma 3D contest. Really interested to see what people come up with.
Anyway, here's the download link for Welder Wait 3D. The archive includes the Windows executable (Game Maker is Windows-only) and the Game Maker "source" file.
Friday, October 10, 2008
Anaglyph Painting Thing
I came across a link to this neat Flash program where you paint in 3D. I had actually been playing around with something like this myself, a paint program where each layer is rendered with a different offset between the red and cyan parts of the image depending on its depth. This one takes a different approach, of actually positioning each drawn object in a 3D space, leading to some really fun and intuitive zooming and panning behavior.
Wednesday, May 28, 2008
Cats in 3D
The other day I noticed that both cats were on my bed sleeping even more deeply than usual. I managed to get anaglyph photos of each of them. Lucy is curled up all sweetly, and the Colonel is in fine form with her arms splayed out. Very cute.
Monday, May 12, 2008
Bike to Shea Day Addendum
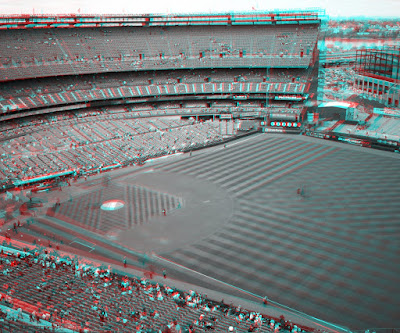
Oops, forgot to link to the other pictures I took, and Blogger won't let me edit the other post. Some pics along the ride and then some at the game, including some 3D anaglyph ones.
Bike to Shea Day
Bike to Shea Day was a blast! Peter changed two flats, Nate spotted a couple warblers, I only almost drove us on to the Grand Central Parkway once, we all got All-Star ballots, and the Mets won 12-6!
Johan Santana was good, but I don't think at the top of his game. The game started out with a goofy error and a good old-fashioned pickle, and there were a lot of other fun moments. You know, as baseball tends to have. Emma and her friend Jose both know their baseball, so it was fun talking to them.
Nate had his "field glasses" (bird-watching jargon for "binoculars") with him, and took advantage of Shea's location in former wetlands to try to spot some birds. He'd been birding earlier that morning, so he had his field guide with him as well.
View Larger Map
As Andrew had predicted, it really did turn out to be "Bike to Shea Day," with the emphasis on the "to": the TransAlt tent wasn't even up anymore when the game let out, there were no cue sheets for the return trip, and people were kind of just clumping up to try and blaze a trail home together, post-apocalyptic road warrior style. I believe one pair even said they were taking their bikes on the 7 train. We muddled our way home without too many missteps.
Overall, a great afternoon. The ride isn't as scenic as the trip up the West Side bike path to Yankee Stadium, but you do go through some neat different areas, including some crazy industrial parts of Queens, and it's all nice and flat with no grueling climb at the end. Really it's not much farther than the Cyclones, though the beers are a lot pricier when you get there.
Friday, May 9, 2008
Bike to Shea Day Tomorrow!
I slept on this last year, but tomorrow I'm totally going to Bike to Shea! I'm totally psyched. I'm not the baseball cap or jersey type (though a fitted t-shirt could tempt me), but I did have to grab some kicks:

It looks like Johan's going to start. I'm psyched to see him strike out Ken Griffey!

It looks like Johan's going to start. I'm psyched to see him strike out Ken Griffey!
More 3D Graphics
Microsoft just released the "community preview" of the new version of their C# game development libraries, and it happens that someone has already done a demo of anaglyph stereo for it:

Looks good! The cool thing about XNA is that you can use it to make Windows games, and then target the XBox (and with this version, the Zune) with the same codebase.
I think if I mess around with any of this stuff in the future I'll still be sticking with Axiom, because targeting Mac and Linux is more practically useful than targeting the XBox and Zune. And an XNA render platform for Axiom is already under development in any case.
Thursday, May 1, 2008
Putting the "Frustum" in "Frustumerated"
DU was right in comments to my last post. Pointing both cameras at the same place (midway between the robots) results in almost identical left- and right-eye images:
 .
.
If you look very closely at the full-size image you can see the red/cyan separation along the antennae, but there is essentially no 3D effect at all.
He mentioned "photons," which leads me to suspect this may be related to how when you look through a telescope and cover half the objective lens with your hand, you see the exact same thing you were seeing before but half as bright, when what you should see is half of the image and then a very large hand. I hate physics.
 .
.If you look very closely at the full-size image you can see the red/cyan separation along the antennae, but there is essentially no 3D effect at all.
He mentioned "photons," which leads me to suspect this may be related to how when you look through a telescope and cover half the objective lens with your hand, you see the exact same thing you were seeing before but half as bright, when what you should see is half of the image and then a very large hand. I hate physics.
You Can't Frustum and You Can't Frust Withoutum
That title is just a joke. Contra my graphics (and award-winning user interface design) instructor in college, it certainly is possible to discuss 3D projection without resorting to the term "frustum."
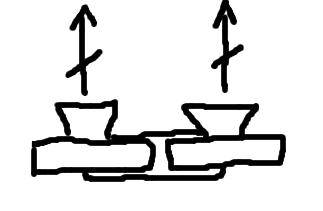
I'm a little confused about what kind of camera setup creates the best anaglyph images. All of the custom hardware setups I've read about people using either have identical cameras exactly side-by-side and pointing in the same direction,
 ,
,
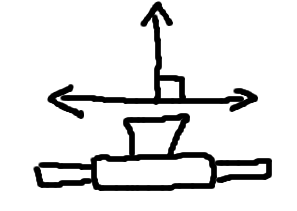
or a single camera mounted so it can slide right and left perpendicular to the direction of the lens,
 .
.
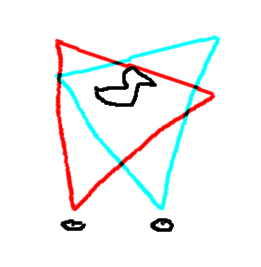
Either of these setups result in two images that reproduce the effect of looking at an object (a duck, say) with your eyes facing exactly the same direction:
 .
.
(Those are eyeballs at the bottom.)
And that's the kind of configuration I've been using for the anaglyph 3D graphics display: move the virtual camera slightly to the left and render the red channel, then move the virtual camera slightly to the right and render the blue and green channels.
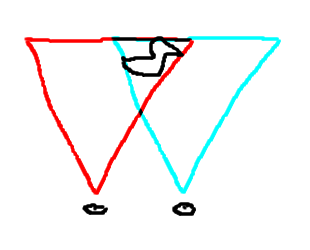
But I think the way human vision actually works is that both eyeballs sort of independently point at whatever you're focusing on. Which is why when a butterfly flies up to you and lands on your nose you end up crossing your eyes. More like this:
 .
.
I think that's more like how I take 3D photos with my digital camera. I don't have a horizontally-sliding mount or two identical cameras, so I just take one picture pointing at an object, move over, and then take another pointing at the same object. I think the result should be more like looking at an object in real life, assuming the viewer is focusing where you expect them to be.
I'm going to try this out in my graphics setup and see how it works.
I'm a little confused about what kind of camera setup creates the best anaglyph images. All of the custom hardware setups I've read about people using either have identical cameras exactly side-by-side and pointing in the same direction,
 ,
,or a single camera mounted so it can slide right and left perpendicular to the direction of the lens,
 .
.Either of these setups result in two images that reproduce the effect of looking at an object (a duck, say) with your eyes facing exactly the same direction:
 .
.(Those are eyeballs at the bottom.)
And that's the kind of configuration I've been using for the anaglyph 3D graphics display: move the virtual camera slightly to the left and render the red channel, then move the virtual camera slightly to the right and render the blue and green channels.
But I think the way human vision actually works is that both eyeballs sort of independently point at whatever you're focusing on. Which is why when a butterfly flies up to you and lands on your nose you end up crossing your eyes. More like this:
 .
.I think that's more like how I take 3D photos with my digital camera. I don't have a horizontally-sliding mount or two identical cameras, so I just take one picture pointing at an object, move over, and then take another pointing at the same object. I think the result should be more like looking at an object in real life, assuming the viewer is focusing where you expect them to be.
I'm going to try this out in my graphics setup and see how it works.
Wednesday, April 30, 2008
3D Graphics
I've been dicking around with the Axiom 3D engine in my free time for a couple days. It's a C# port of OGRE, and someone had figured out how to do a red/cyan anaglyph display in OGRE, so I was trying to get that to work in Axiom:

I had to make some changes to some of Thieum's original material scripts to account for features that aren't supported yet in the current Axiom alpha release, but it seems to basically work.
I'll be sure to let people know when I start producing the next Björk video.

I had to make some changes to some of Thieum's original material scripts to account for features that aren't supported yet in the current Axiom alpha release, but it seems to basically work.
I'll be sure to let people know when I start producing the next Björk video.
Tuesday, April 29, 2008
Tuesday, April 1, 2008
Pretty Smart
This dude made 3D images by sticking subsequent frames from Alien together: corridor, bridge. That's a really good idea, and it would work with any panning shot without action. It would never have occurred to me.
This one did occur to me, and I'm glad to see that someone's done it, even if it totally doesn't work (the blue is wrong).
There's a lot of good stuff on flickr that comes up if you search for "3D". Exteriors and landscapes seem to work really well.
This one did occur to me, and I'm glad to see that someone's done it, even if it totally doesn't work (the blue is wrong).
There's a lot of good stuff on flickr that comes up if you search for "3D". Exteriors and landscapes seem to work really well.
Monday, March 24, 2008
More 3D Photos
I did some more 3D stuff. Got a couple somewhat blurry ones around the house, and one in particular of some houseplants on the windowsill that came out really nice. Also a good shot outside the post office and one inside taken on my celly (a violation of the 3D PATRIOT Act X-Treme). And one of my blood getting drained by the vampires at the NY Blood Center.
I decided to put everything into a 3D set on Flickr.
I decided to put everything into a 3D set on Flickr.
More 3D Stuff
I don't know why this didn't occur to me before, but it's totally easy to take 3D pictures with a regular camera. I found a tutorial on how to do it, but it basically just boils down to dropping the green and blue channels out of the left eye image and the red out of the right and multiplying them together.
My first attempt was kind of wack, I think because the two images were too far apart and not parallel. It's my mouse and tea mug:

Then I took this picture of my bike, which I thought would be a good reference for my 3D pencil drawing. It came out amazing, despite the right image being a little blurry. It looked good enough that I went back and redid it in color. Still awesome. The handlebars and near pedal really jump out:

And finally I did this picture of my messy desk and bookshelf. It looks alright:

I think the first and third images both suffer from too much variation in depth. You can see that, e.g., the laptop screen in the first picture and the phone cord in the last one are way far apart from each other in the two channels, and when you look at them through the glasses those parts are not easily resolved into coherent objects without refocusing your eyes.
Now that I had more of an idea how to work with this stuff on the computer, I scanned in my original ink line art that I had traced for the 3D pencil drawing. I separated it into red and blue/green layers and then moved stuff around and the results are actually okay:

I plan to keep playing with this stuff...I definitely need some 3D cat photos, and I want to try the drawing kit with some better pencils.
Friday, March 21, 2008
3D Bicycle Drawing
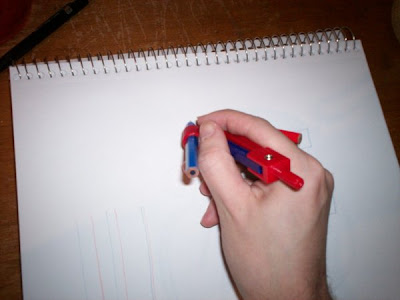
A couple months ago Peter and I were talking about how to do 3D drawings. I was thinking of just doing line art and then shifting stuff around in different colored layers on the computer. But Peter happened to come across this little 3D drawing kit and picked one up for me:

It's this little plastic "compass" that holds a blue and red pencil in place so you can draw with both of them at the same time at a fixed distance apart from one another. Here are the instructions from the back of the package:

And here it is in use as I draw some practice shapes:
Today on my day off I was fiddling with my bike, and I swapped out my flat bars for some drops from a bike salvaged from the trash a couple months back. I did a quick ink drawing of it so I could trace it with the compass:

Here's the finished drawing. I started tracing at the rear wheel with the pencils very close together and then as I worked my way "forward" I moved the pencils farther apart. I'm not sure how well the 3D ended up working, but it still looks sort of cool:

Update: as soon as I posted this and was looking at the finished drawing again, I thought to check something. The blue pencil that came with the kit is totally the wrong color: if you hold the red lens of the glasses right against the paper then you only see the blue lines, but if you look through the blue side then both lines are clearly visible. I think actually the pencil is close to "true blue," whereas the glasses are cyan. I'll have to pick up a cyan pencil and see if I can get better results.

It's this little plastic "compass" that holds a blue and red pencil in place so you can draw with both of them at the same time at a fixed distance apart from one another. Here are the instructions from the back of the package:

And here it is in use as I draw some practice shapes:

Today on my day off I was fiddling with my bike, and I swapped out my flat bars for some drops from a bike salvaged from the trash a couple months back. I did a quick ink drawing of it so I could trace it with the compass:

Here's the finished drawing. I started tracing at the rear wheel with the pencils very close together and then as I worked my way "forward" I moved the pencils farther apart. I'm not sure how well the 3D ended up working, but it still looks sort of cool:

Update: as soon as I posted this and was looking at the finished drawing again, I thought to check something. The blue pencil that came with the kit is totally the wrong color: if you hold the red lens of the glasses right against the paper then you only see the blue lines, but if you look through the blue side then both lines are clearly visible. I think actually the pencil is close to "true blue," whereas the glasses are cyan. I'll have to pick up a cyan pencil and see if I can get better results.
Subscribe to:
Posts (Atom)